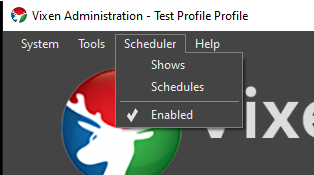
Show Scheduler
After you have setup your Show in the Show Editor, you will want to schedule it to run.
Creating a Schedule
To get to the scheduling in Vixen, Select Scheduler -> Schedules from the main Admin screen.
Add, Edit and Delete a Schedule

Once you have selected Scheduler -> Schedules from the main Admin screen, you will be presented with the above Scheduler screen. From this you can view your currently scheduled items, add, edit and delete scheduled items. To access the available options, you can either right-click in the list or press one of the buttons below the list.
Select the green plus button to add a new scheduled item.
Select the pencil button to edit the selected schedule item.
Select the red minus button to delete the selected schedule item.
Press the spreadsheet with pencil button on the lower left to edit the show associated with the selected scheduled item.
Adding & Editing a Schedule
When editing a Schedule you will be presented with the following dialog to setup the details of the schedule.

Show Scheduling
The Schedule a Show dialog will allow you to setup your show to run on certain days at certain times between the dates you set. For a show to successfully run, ALL of the following options must be true. For example, it must fall on or between the dates selected, the day of the week must be selected and the time must fall on or between the times selected.
The options are explained below:

First, you want to selected the show you would like to run when this schedule is executing. The show is setup in the Show Editor before setting up the schedule. Shows can be either enabled or disabled. This allows you to setup a bunch of different schedules as tests or whatever you want and set them to disabled if you don’t want them to execute.

Select the date you want your show to start and the date you want your last show to run.

Check the days you want your show to run.

Enter the start time and end time of your show.
Enabling the Scheduler

Ensure from the main Admin screen that the scheduler is enabled by selecting the Enabled button. The check mark indicates the scheduler is enabled and you should see the Scheduler Status window showing when the next scheduled item will occur.
Video Tutorial
Feedback
Was this page helpful?
Glad to hear it!
Sorry to hear that. Please tell us how we can improve.